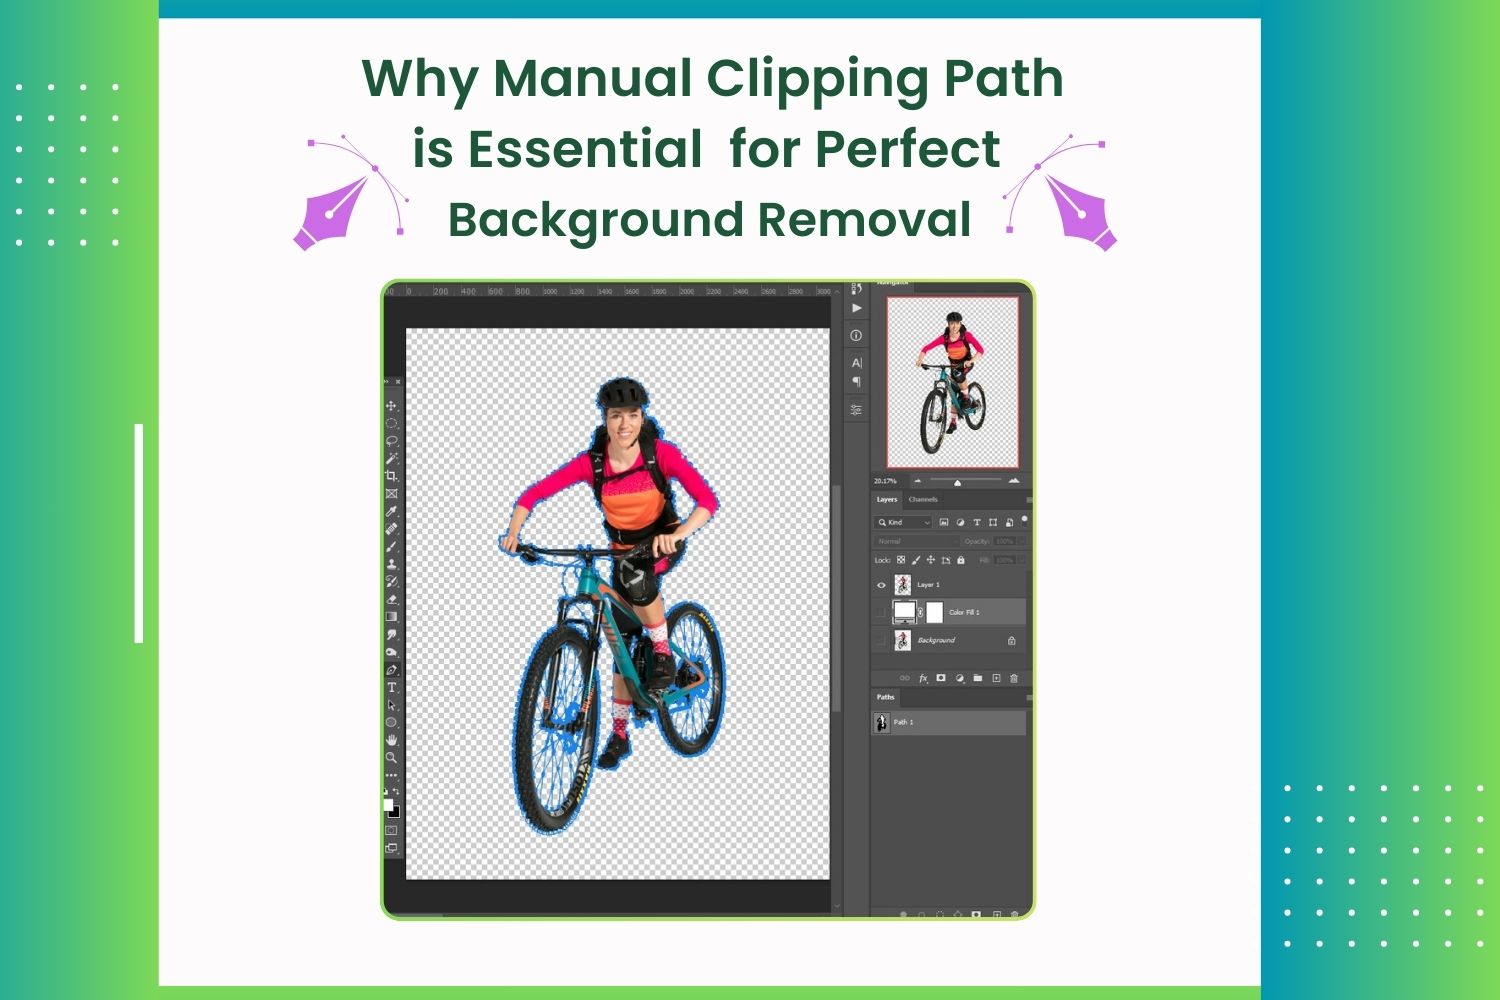
Essential Tips for Stunning Product Photography
In the world of e-commerce, product photography reigns supreme. It’s the visual handshake between your brand and potential customers.
But what makes a product photo stand out?
Table of Contents
ToggleIt’s not just about having a high-end camera. It’s about understanding the art and science behind capturing a product in its best light.
This guide is your roadmap to stunning product photography. It’s designed to equip you with the knowledge and techniques to create compelling product images. Whether you’re a seasoned photographer or a beginner, there’s something here for you.
We’ll delve into the importance of product photography in e-commerce and marketing. We’ll explore the role of lighting, the right camera settings, and the significance of a tripod.
You’ll learn how to create a cost-effective home studio setup. We’ll discuss different lighting setups, background selection, and the use of props.
We’ll also cover composition techniques, shooting products from multiple angles, and highlighting product features. You’ll discover the role of post-processing in enhancing product images and the basics of photo editing.
But that’s not all.
We’ll also touch on the legal aspects of product photography, the benefits of hiring a professional, and how to build a portfolio. You’ll learn about networking and marketing strategies, pricing, and client communication.
And because we’re living in a digital age, we’ll look at the future trends in product photography, including augmented reality.
So, are you ready to elevate your product photography game? Let’s dive in.
Understanding the Basics of Product Photography
Product photography is an essential pillar in commercial photography. It’s where creativity meets technical precision. Capturing a product’s essence involves more than just pointing a camera.
A keen understanding of lighting and composition makes the difference. Each shot should tell a story that resonates with potential buyers. The goal is to create an image that attracts and converts viewers into customers.
To excel in product photography, one must grasp the fundamental principles. These include selecting the right camera equipment and mastering lighting techniques. A clear understanding of photo composition and styling is also essential.
Here are some key elements to focus on:
- Lighting: Natural vs. artificial, diffusers, reflectors
- Camera: Types, lenses, settings
- Composition: Rule of thirds, angles, backgrounds
- Post-processing: Editing software, retouching, color correction
Exploring and experimenting with these elements will open new avenues in product photography. They are the building blocks for creating vivid, compelling, and authentic images.
The Role of Product Photography in E-commerce

In the competitive world of e-commerce, first impressions matter immensely. High-quality product photos can captivate and maintain a customer’s attention. They are crucial in building a strong brand image.
A well-crafted image does more than show a product. It communicates brand values and quality. In online shopping, customers rely heavily on visuals, making images pivotal.
Good product photography boosts engagement and sales. It reduces uncertainty and builds trust. Investing in high-caliber photography is, therefore, not just an option but a necessity for e-commerce success.
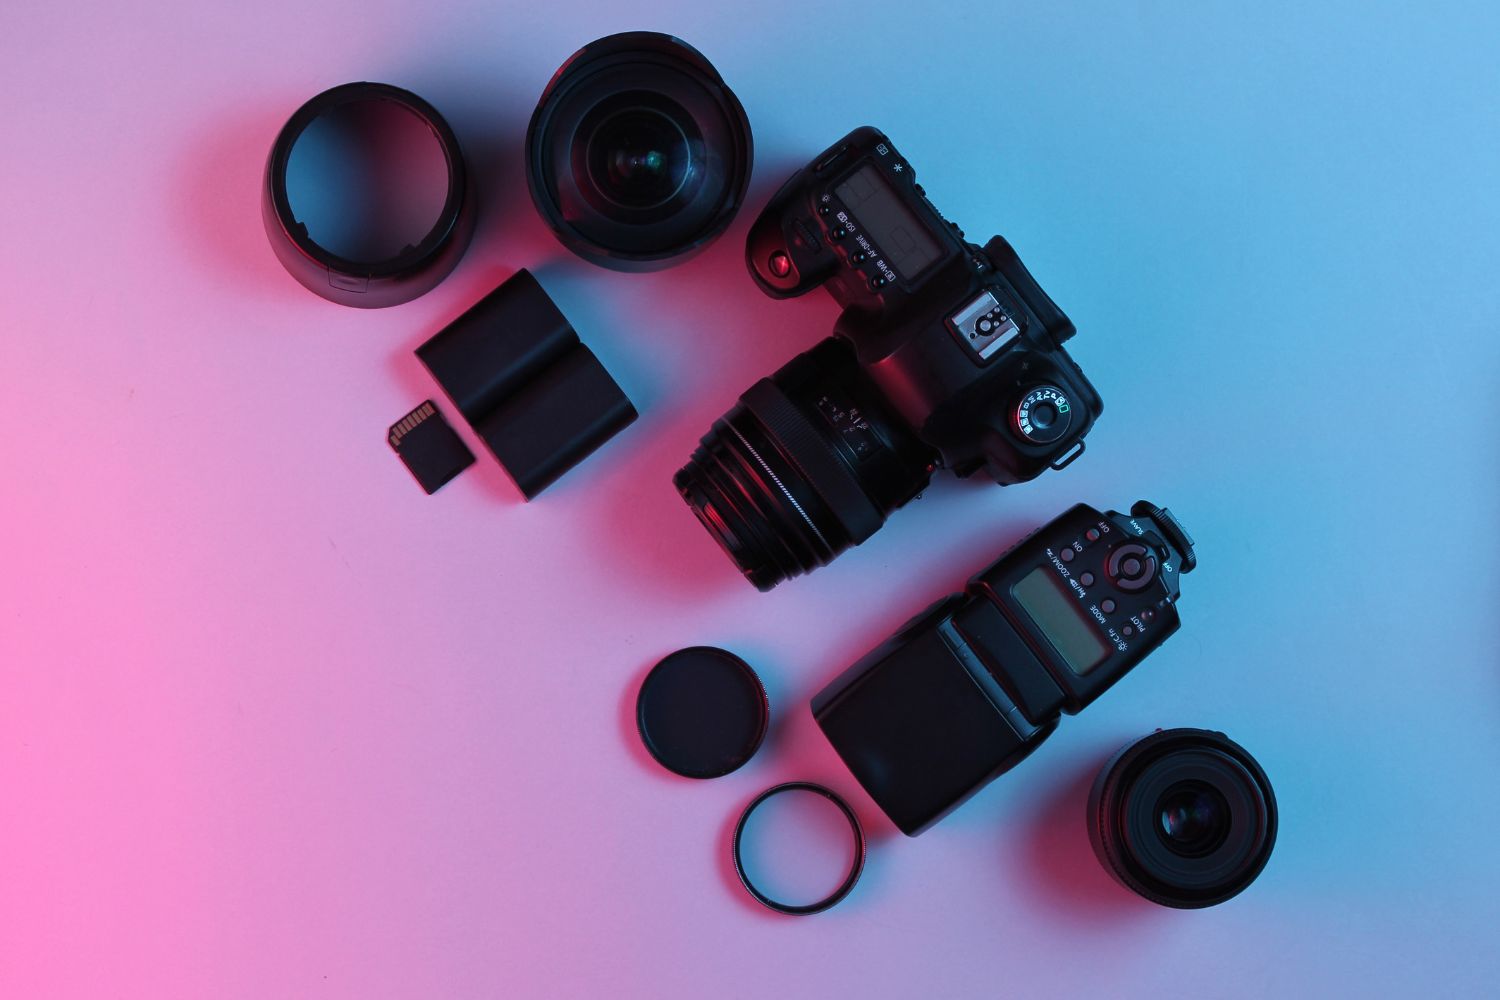
Key Equipment for High-Quality Product Shots
To capture stunning product images, the right equipment is a must. While a high-end camera is beneficial, it’s not the only tool needed. Understanding the role of each piece of gear is crucial.
A camera capable of manual settings gives you greater control. DSLRs and mirrorless cameras are popular choices. Lens selection also impacts image quality. Prime lenses are often favored for their sharp focus.
Equally important is a sturdy tripod. It ensures stability, especially in low-light settings or long exposures. Tripods help maintain consistent framing between shots.
Here’s a rundown of essential equipment:
- Camera:DSLR or mirrorless
- Lenses:Prime lenses, macro lenses
- Tripod:Stability for sharp images
- Lighting:Diffusers, softboxes, reflectors
Lighting tools like diffusers and reflectors play significant roles, especially in studio photography. They help control shadows and highlights for more balanced images.
Lighting Techniques for Product Photography

Lighting is the backbone of stunning product photography. Without proper lighting, even the most expensive equipment falls short. Mastering lighting can elevate the quality of your images dramatically.
There are several aspects to consider when working with lighting in studio photography. The direction, intensity, and color temperature all impact the final image. Understanding how to manipulate these elements is crucial.
The right lighting can highlight a product’s texture and form. It enhances colors and brings out intricate details. Effective lighting can transform an ordinary product into a desirable object.
Diffusing the light source often results in softer shadows and a more natural look. Reflectors can be used to bounce light back onto the product. This technique fills in shadows and creates a balanced scene.
Investing time in learning lighting setups will pay off in the long run. Experimentation is key to discovering what works best for different products and settings.
Natural Light vs. Artificial Light: Pros and Cons
Natural light offers a soft, pleasing tone, ideal for lifestyle images. It’s cost-effective and easily available, making it a popular choice for many photographers. However, it is unpredictable and can vary throughout the day.
On the other hand, artificial light offers consistency. With artificial lighting, you gain control over light direction, intensity, and color temperature. This is particularly useful for maintaining a consistent look across images.
Despite its benefits, artificial lighting can be expensive and require a learning curve. Adjusting equipment to get the desired effect can be time-consuming. Balancing the two types of light can yield versatile and dynamic images.
Different Types of Lighting Setups
Lighting setups provide the blueprint for how the product will be illuminated. There are various arrangements to choose from, each offering unique results. A popular and versatile setup is three-point lighting.
Three-point lighting uses a key light, fill light, and backlight. The key light is the primary source, filling in the majority of the scene. The fill light softens shadows created by the key light, and the backlight separates the subject from the background.
Here’s a quick breakdown of common lighting setups:
- Three-Point Lighting:Key, fill, back
- Overhead Lighting:Direct, soft for overhead shots
- Side Lighting:Dramatic shadows, good for texture
Choosing the right setup depends on the product and the mood you want to convey. Overhead lighting works well for flat lay compositions. Side lighting accentuates textures and creates depth.
Experimentation is key to finding what best highlights the product. Trying different setups will help you understand how light interacts with your subject. Mastering this skill will significantly improve your commercial photography results.
Camera Settings and Lens Selection

Selecting the right camera settings is crucial for capturing high-quality product images. The right settings can make products appear more appealing and detailed. Each product might require unique adjustments to settings based on lighting and composition.
Key settings to consider include:
- Aperture:Controls depth of field; f/8 to f/11 is ideal for sharpness.
- Shutter Speed:Affects motion blur; 1/125s or faster to avoid camera shake.
- ISO:Impacts image noise; keep it low, around 100-200, for clear images.
Understanding how these settings interact allows for creative control over the final image. Adjusting one setting often requires changes to others for a balanced exposure.
The choice of lens significantly impacts the quality of product photos. A macro lens is ideal for capturing intricate details in small products. Standard zoom lenses offer versatility for a range of product sizes.
Experimenting with different lenses will give you insight into their unique attributes. Your chosen lens should complement your camera settings for the best results.
Choosing the Right Camera for Product Photography
When selecting a camera for product photography, consider your specific needs. High resolution is often paramount for detailed images. A camera with at least 24 megapixels offers flexibility in cropping without losing clarity.
Mirrorless cameras have gained popularity for their compact size and advanced features. They allow real-time exposure adjustments, which is beneficial when tweaking settings on the go.
A full-frame camera can capture more detail with better color accuracy. This is particularly useful in commercial photography, where quality is critical. However, entry-level DSLR cameras are also capable of delivering excellent product photos.
Ultimately, the best camera is one that suits your budget and skill level. Investing in a camera with manual mode gives you more control over creative decisions. Your choice should enhance rather than hinder your photography capabilities.
The Importance of Using a Tripod

A tripod is an essential tool in product photography. It ensures stability, particularly when using slower shutter speeds. Even a slight hand movement can blur the image, affecting its sharpness.
Using a tripod allows you to maintain consistent framing across shots. This is crucial when shooting a series of products or creating a cohesive look for a product line. Consistency enhances professionalism and aids in visual storytelling.
Moreover, a tripod frees your hands for adjusting the product or lighting. This improves efficiency during the shoot, allowing for more focus on creative aspects. Investing in a quality tripod is a worthwhile decision for any serious photographer.
Creating the Perfect Studio Setup
A well-designed studio setup is fundamental for stunning product photography. It creates a controlled environment where variables like light and composition can be precisely managed. This consistency is vital for producing high-quality images every time.
Start by choosing a space that can be dedicated to photography. This minimizes disruptions and allows for a permanent setup. A dedicated space enhances workflow efficiency, reducing time spent on setup and teardown.
Consider the layout and what equipment fits best in the space. An effective studio includes sufficient lighting, backdrops, and props. These elements enhance versatility, allowing you to photograph a diverse range of products.
Invest in multi-purpose equipment to maximize the utility of your studio. Key items include adjustable lights, retractable backdrops, and flexible tripod systems. This flexibility allows for quick adaptations to different product photography needs.
Essential studio equipment checklist:
- Adjustable lighting: key for consistent exposure across shots.
- Tripods and stands: to hold cameras and lighting firmly in place.
- Variety of backdrops: for different product types and moods.
- Reflectors and diffusers: to control shadows and highlights.
In essence, a perfect studio setup combines convenience with functionality. Each element should work towards enhancing the overall quality and creativity of your product photos.
Building a Cost-Effective Home Studio
Creating a home studio need not be expensive. Strategic choices can yield professional results on a budget. Start by repurposing items you already own; this reduces costs significantly.
For instance, use a sturdy table as a shooting surface. Natural light from windows can serve as a primary light source. Supplement this with affordable desk lamps if necessary. You might be surprised at how well ambient home lighting can complement product shots.
Consider DIY solutions for other elements. Simple white poster boards or fabrics can serve as seamless backdrops. These are effective in isolating the product and keeping focus sharp.
Budget-friendly studio elements:
- Repurposed furniture: such as tables and chairs for varied heights.
- DIY backdrops: using household items like tablecloths or curtains.
- Affordable lighting alternatives: like clip-on desk lamps or natural sunlight.
The key is to focus on essentials first and expand as your needs grow. This way, your home studio evolves sustainably, without a massive upfront investment.
The Benefits of Using a Lightbox
A lightbox is a game-changer for product photography, particularly with small items. It provides evenly distributed lighting, reducing harsh shadows and glares. This creates a clean, professional look that highlights the product’s features.
Lightboxes are incredibly simple to use and set up. They often come with built-in LED lights and diffused sides, creating a soft light that wraps around the object. This is especially beneficial when photographing reflective surfaces, as it minimizes reflections.
Moreover, lightboxes are compact, making them ideal for home studios with limited space. They require little adjustment, allowing you to focus on the creative aspects of photography. Here is a guide on choosing the lightboxes.
Composition and Styling for Impactful Images

Great composition elevates product photography from mere pictures to captivating visuals. It directs attention to the product’s most appealing aspects. To achieve this, employ composition techniques that enhance the product’s presence and allure in every shot.
Start with the rule of thirds. This principle suggests dividing your frame into three equal parts, both vertically and horizontally. Positioning your subject along these lines or at intersections naturally draws the viewer’s eye to the product.
Symmetry and balance offer another compositional tool. While the rule of thirds promotes dynamic asymmetry, symmetry brings harmony. When used correctly, both can highlight the product’s uniqueness.
Negative space is powerful and often overlooked. Surrounding your subject with empty space emphasizes its features and crafts a minimalist aesthetic. It can also create breathing room, allowing the product to stand out more prominently.
Key composition elements:
- Rule of thirds: Creates dynamic interest.
- Symmetry and balance: Provides visual harmony.
- Negative space: Enhances focus and simplicity.
- Leading lines: Guides the viewer’s gaze.
Consider the product’s dimensions and textures in your composition. Close-ups can highlight intricate details, while wider shots can place the product in context, communicating its scale and use.
Composition Techniques to Showcase Your Product
Composition is crucial in making your product shine. A carefully composed image can highlight the best features of a product. Use the rule of thirds to create a balanced and interesting layout. This guides the viewer’s gaze naturally and keeps the product central to the frame.
Leading lines are effective in directing focus. Use elements in your environment to guide the eye towards the product. Lines can originate from corners or edges, working to enhance the subject’s importance.
Depth and perspective add another dimension. By shooting at angles, you give a sense of depth that a flat image can’t convey. This makes the product appear more tactile and appealing, engaging viewers more effectively.
Using Props and Backgrounds Effectively
Props and backgrounds are not just secondary elements in product photography. They enhance storytelling and context. Choose backgrounds that complement but do not overshadow the product. Neutral tones often work best, ensuring the product remains the focal point.
Props can convey usage, scale, and lifestyle aspects. For instance, coffee beans around a coffee cup suggest warmth and comfort. However, props should not clutter the image; they need to support the main subject.
Use backgrounds to create mood and contrast. Light backgrounds give a clean and bright feel, while darker ones can suggest luxury and sophistication. Matching the background and props to your brand aesthetic strengthens the overall imagery.
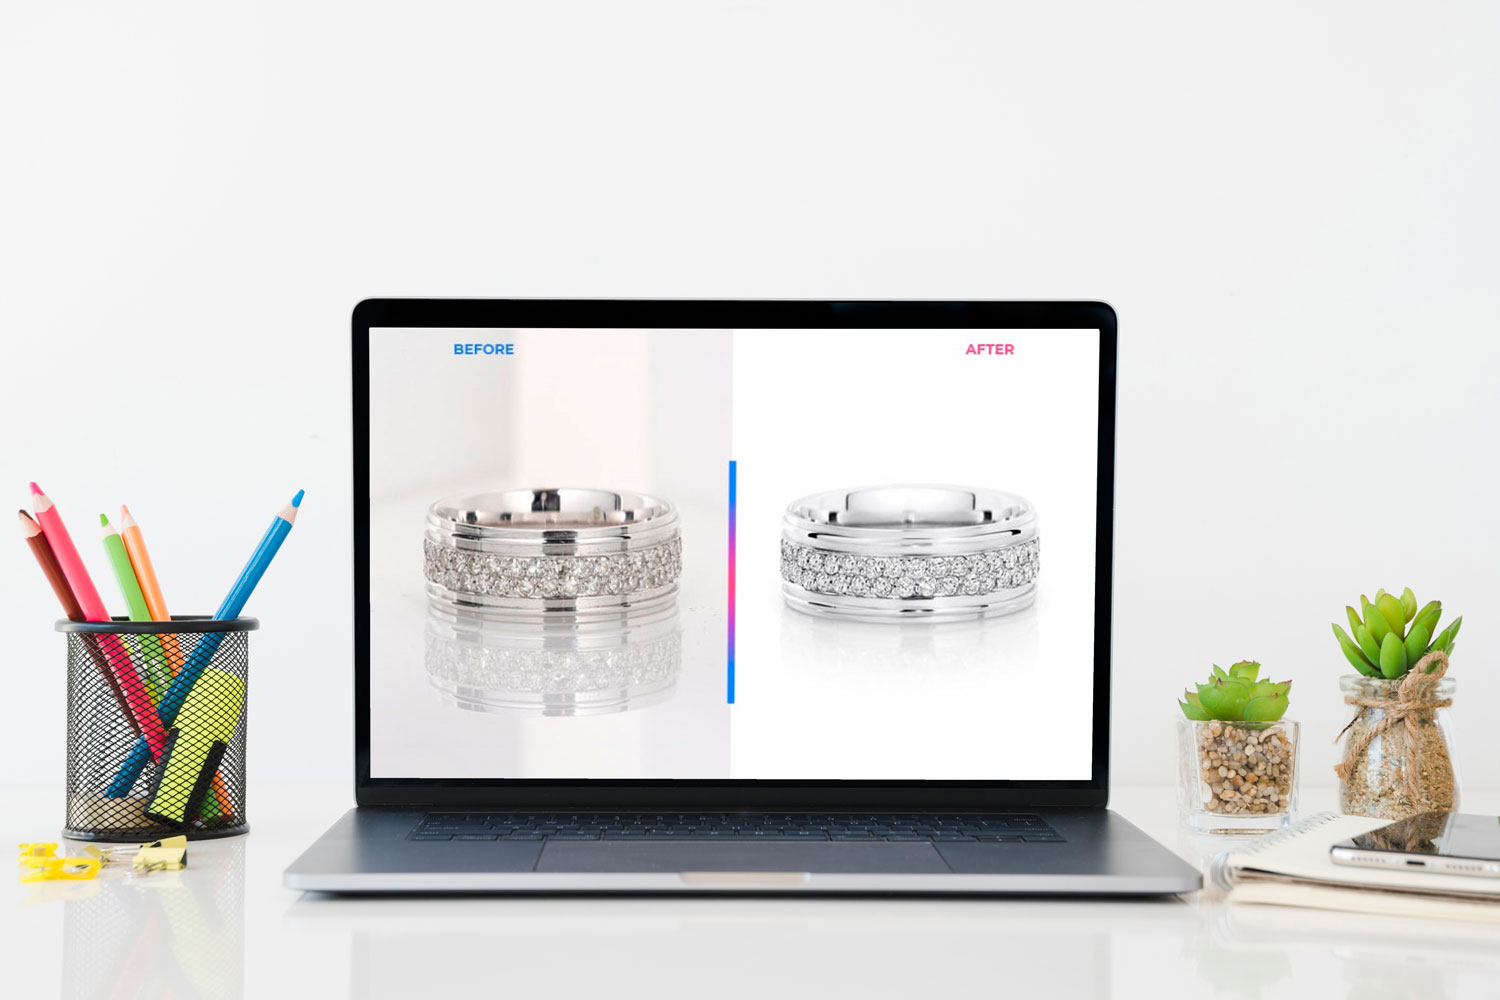
Post-Processing and Editing Best Practices

Post-processing is a crucial step in product photography. It transforms good photos into stunning visuals. With effective editing, you can refine colors, adjust lighting, and sharpen details. Ensuring consistency across images also helps in maintaining brand identity.
Photo editing software like Adobe Photoshop or Lightroom offers extensive tools. From simple adjustments to complex edits, these platforms allow photographers to fine-tune their work. Correcting color balance, enhancing contrast, and removing unwanted elements can significantly improve image quality.
Accuracy in editing is essential. Missteps here can lead to over-edited photos that look unnatural. Maintaining a natural and realistic look should always be the goal. This ensures that the product appears as true to life as possible.
Here are some key post-processing steps:
- Color correction: Ensures accurate color representation.
- Exposure adjustment: Achieves balanced light and shadow.
- Background cleanup: Removes distractions.
- Sharpening: Enhances details.
Consistency is vital when dealing with multiple photos. Create editing presets to maintain uniformity across images. This method saves time and preserves the coherence of a product collection.
Basic Photo Editing Techniques
Basic editing techniques lay the foundation for high-quality images. Start with cropping to improve composition and eliminate distractions. This simple act can dramatically influence the photo’s focus and effectiveness.
Next, focus on exposure and contrast adjustments. Proper exposure ensures the product is neither too dark nor too light. Adjusting contrast adds depth by enhancing the difference between light and dark areas, making the product pop.
Color correction follows. This step involves adjusting white balance to ensure accurate color representation. Accurate colors help in portraying the product truthfully, vital for potential buyers.
Key editing tools:
- Crop tool: Refine composition.
- Exposure slider: Adjust brightness.
- Contrast adjustment: Enhance image depth.
- White balance tool: Correct color temperature.
Advanced Retouching Tips

Advanced retouching takes basic edits to the next level. Techniques like spot healing and cloning remove blemishes and distractions. This ensures every part of the product is presented flawlessly.
Use selective adjustments to highlight specific features. This draws attention to the product’s selling points without altering its true appearance. Precision in these edits makes a difference in achieving professional-looking results.
Shooting Products from Multiple Angles
Capturing products from multiple angles provides comprehensive views. This approach reveals details not visible in a single shot. It enhances understanding of a product, essential for online shoppers who can’t physically interact with it.
Diverse angles highlight different features. They offer a better sense of the product’s texture, size, and functionality. Varied perspectives also help showcase unique aspects that might appeal to potential buyers.
Consistency across all shots is vital. Using standardized angles ensures a professional look. This creates uniformity, which aids in building a cohesive brand presence.
Here are benefits of shooting from multiple angles:
- Complete view: Offers a holistic understanding of the product.
- Feature emphasis: Highlights unique details.
- Increased buyer trust: Provides transparency.
- Enhanced storytelling: Captures product essence.
The Importance of Multiple Angles for Online Sales
Multiple angles boost buyer confidence in online sales. They allow consumers to virtually inspect the product as if it were in their hands. This inspection capability is critical for items where details influence buying decisions.
Photos from several views help in reducing returns. Customers are less likely to return an item that meets their visual expectations. Thus, multiple angles not only improve the shopping experience but also contribute to customer satisfaction.
Tips for Consistent Angles and Framing
Consistency in angles and framing enhances professionalism. It ensures that all products on a platform have a uniform look. This uniformity contributes to a cohesive brand image, vital in e-commerce.
Using reference images or marks on your setup can help. This makes it easy to replicate angles and framing. Even when shooting different products, maintaining set angles and framing remains important for a polished presentation.
Legal and Ethical Considerations in Product Photography

In product photography, understanding legal and ethical aspects is crucial. These considerations can save you from potential legal issues. They also contribute to professional integrity.
Photographers need to be aware of intellectual property laws. This includes copyright, trademarks, and licensing agreements. Using protected designs or brands without permission can lead to serious consequences.
Additionally, ethical considerations should guide your work. This involves honest representation of products. Misleading images can damage credibility and customer trust. Ethical practices build a strong foundation for long-term success.
Understanding Copyright and Trademarks
Copyright protects the photographer’s work. It grants exclusive rights over how images are used. Always ensure that your work is original, or you have rights for what you feature.
Trademarks protect brand elements. Using a trademarked logo or design needs permission. It’s essential to avoid infringing on these rights. A clear understanding helps you navigate complex legalities and maintain professionalism.
Sustainable Practices in Photography
Sustainability in photography is gaining importance. Use environmentally-friendly materials and processes whenever possible. Opt for digital delivery to reduce waste. Sustainable practices not only protect the planet but also appeal to eco-conscious clients.
Marketing Your Product Photography Services
Marketing is crucial for any product photography business. It opens doors to new opportunities and clients. Strategic marketing can set you apart in a competitive field.
Begin by identifying your unique selling points. What makes your photography special? It could be your style, attention to detail, or technical skills. Highlight these strengths in your marketing materials.
Social media is a powerful tool. Use platforms like Instagram and LinkedIn to showcase your work. Consistent posting and engagement can build a strong online presence. Don’t underestimate the power of word of mouth.
Networking is equally important. Attend industry events to meet potential clients and collaborators. Engage with photography communities online and offline. Networking can lead to collaborations and referrals.
Remember to use professional channels for business communications. Websites, email marketing, and newsletters can all serve as touchpoints. Regularly update your followers and clients with your latest works and achievements.
Building a Portfolio and Networking
A strong portfolio is a photographer’s best marketing tool. It showcases your skills and versatility. Ensure your portfolio highlights your best work and a variety of styles.
Creating a compelling portfolio involves careful selection. Choose images that not only look good but tell a story. Variety in your portfolio can demonstrate versatility to potential clients.
Networking should complement your portfolio. Attend photography exhibitions, join professional associations, and participate in forums. These platforms provide opportunities to connect and learn.
Consider the following strategies for effective networking:
- Join local photography meetups.
- Collaborate with other creatives on projects.
- Engage with potential clients at industry events.
Networking is not just about making connections; it’s about fostering relationships. Strong relationships can turn into long-term clients and advocates for your work.
Pricing Strategies and Client Communication
Setting the right price for your services is essential. It must reflect your expertise, market rates, and client budgets. Competitive pricing strategies can attract more clients.
Effective communication with clients is equally important. Understand their needs and expectations. Clear communication builds trust and ensures smoother collaborations. Always provide detailed contracts outlining deliverables and timelines.
The Future of Product Photography

The landscape of product photography is constantly evolving. Innovations in technology are driving these changes. Photographers must adapt to stay relevant.
Augmented Reality (AR) is one such advancement. It offers immersive experiences for customers. Buyers can now see products in their own environment before purchasing.
Virtual reality is another frontier. It can provide complete 360-degree views of products. This technology enables customers to examine every detail with precision.
Moreover, the demand for interactive content continues to grow. Consumers seek engaging and informative online experiences. Product photographers should be ready to deliver.
Embracing New Technologies like AR
Augmented Reality (AR) is reshaping the e-commerce scene. It bridges the gap between physical and online experiences. Products can be visualized in real-world settings through AR apps.
This technology greatly enhances customer engagement. Shoppers appreciate seeing how products fit into their lives. AR encourages exploration and can drive purchasing decisions.
Trends and Predictions for Product Photography
The product photography sector shows no signs of slowing. One key trend is the rise of personalized content. Brands are customizing imagery to cater to individual consumer preferences.
Sustainability is also becoming a focus. Photographers are exploring eco-friendly practices in their shoots. This shift responds to increased consumer awareness about environmental issues. Embracing these trends is essential for future success.
Conclusion:
Mastering product photography requires dedication and continuous learning. The field is vast, with many details to consider. Each element, from lighting to composition, plays a crucial role.
Embracing new tools and techniques will set you apart. Stay open to innovative technology like AR and VR. These advancements can broaden your creative possibilities and appeal to more clients.
Finally, remember that practice is key. Experiment with different styles and approaches. The more you practice, the better your skills will become, enabling you to capture stunning, impactful images.