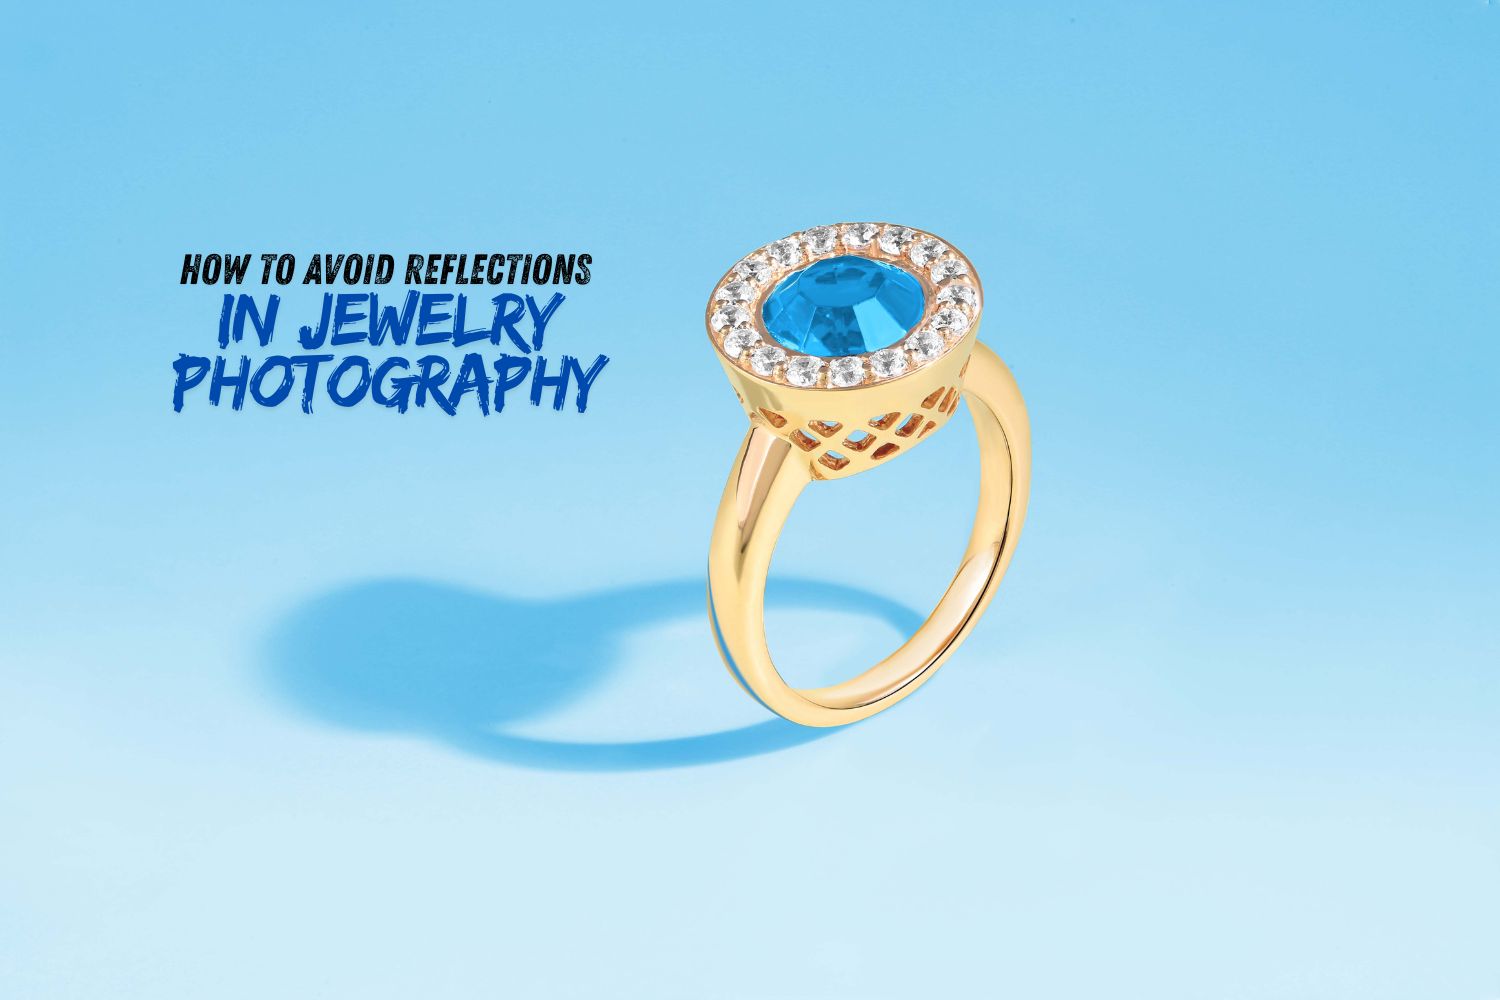
How to Avoid Reflections in Jewelry Photography: Expert Guide
Have you ever shot what you believed was the perfect jewelry shot, only to find unwanted reflections that make your spectacular piece appearance like a funhouse mirror? You’re not alone. Reflections are the bane of precious jewelry professional photographers all over, turning gleaming diamonds into glaring white spots and transforming sleek gold into sidetracking bright spots.
Precious jewelry photography provides distinct obstacles that other product photography simply doesn’t face. The very qualities that make jewelry beautiful– its reflective surfaces, metal finishes, and faceted gems– are exactly what produce photographic headaches. Here’s the good news: with the ideal techniques and a bit of practice, you can master the art of catching precious jewelry without those annoying reflections stealing the show.
Table of Contents
ToggleWhether you’re an e-commerce business owner attempting to showcase your items, a precious jewelry designer desiring to highlight your craftsmanship, or a photographer seeking to broaden your skillset, comprehending how to manage reflections will change your precious jewelry images from amateur snapshots to professional-quality photos that really offer.
Understanding Reflections in Jewelry Photography
Consider jewelry as a collection of tiny mirrors. Every polished surface area, from the smooth band of a ring to the faceted surface of a gems, imitates a mini reflector. When light hits these surface areas, it recuperates toward your electronic camera, creating intense areas, glare, and unwanted reflections that can completely obscure the precious jewelry’s information and charm.
Reflections in fashion jewelry photography typically fall into 2 classifications: diffuse reflections and specular reflections. Specular reflections are those harsh, bright areas that appear when direct light bounces off a smooth surface area straight back to your camera. These are the troublemakers that can totally white out parts of your fashion jewelry. Diffuse reflections, on the other hand, are softer and more expanded, but they can still muddy the appearance of your fashion jewelry and minimize contrast.
The challenge becomes a lot more intricate when you think about that precious jewelry typically combines numerous reflective materials. A single ring may feature refined gold, brushed silver accents, and a faceted diamond. Each material reflecting light differently and needing its own approach to manage effectively.
Comprehending how light acts around jewelry is the primary step toward managing it. Light does not simply bounce off the leading surface of your jewelry; it can go into gems, show internally, and exit at different angles. This is why an easy method of “simply utilize soft light” frequently isn’t enough for fashion jewelry photograph
Controlling Lighting for Better Results

Lighting control is your most powerful weapon against undesirable reflections. The crucial principle here is easy: harsh, direct light creates severe reflections, while soft, diffused light produces workable reflections that boost instead of distract from your fashion jewelry.
Start by positioning your main light at a 45-degree angle to your fashion jewelry instead of straight overhead or head-on. This angle helps lessen direct reflections while still offering sufficient lighting. But angle alone isn’t enough, you need to soften that light.
You can create diffused lighting using softboxes, umbrellas, or even a simple white sheet stretched in between your light source and your fashion jewelry. Believe of it like the difference in between looking at a bare light bulb (extreme and glaring) versus looking at that same bulb through a frosted lampshade (pleasant and soft).
Consider utilizing numerous light sources to complete shadows and develop more even lighting. A main light for primary illumination, integrated with fill lights to minimize contrast, can assist you attain that ideal balance where your fashion jewelry is well-lit however not overwhelmed by reflections. LED panels work particularly well for fashion jewelry photography due to the fact that they supply constant, manageable light that doesn’t produce excessive heat.
One expert strategy includes producing a “light camping tent”, surrounding your jewelry with translucent product that diffuses light from all directions. This develops extremely even lighting that reduces harsh reflections while maintaining the sparkle and luster that makes fashion jewelry appealing.
Using Polarizing Filters Effectively

Polarizing filters resemble sunglasses for your electronic camera lens, and they can be absolute game-changers for precious jewelry photography. These filters work by obstructing light waves that are vibrating in specific directions, which can significantly reduce reflections from metal and glass surfaces.
You can rotate it while looking through your viewfinder or LCD screen to see its impact in real-time when you attach a polarizing filter to your lens. You’ll notice that reflections become less extreme, colors become more saturated, and the general contrast in your image improves. It’s nearly like magic, but it’s actually just physics operating in your favor.
Polarizing filters aren’t a universal option. They work best on reflections from non-metallic surfaces and can be less reliable on extremely sleek metals. In addition, they minimize the quantity of light reaching your sensor by about one to 2 stops, so you’ll need to adjust your direct exposure appropriately.
The secret to using polarizing filters effectively in fashion jewelry photography is understanding when to utilize them and when to rely on other strategies. They’re particularly beneficial when photographing precious jewelry with gems, as they can decrease surface area reflections on the stones while permitting their internal fire and luster to shine through.
Strategic Backgrounds and Camera Angles
When it comes to controlling reflections, the background and camera angle you choose can make or ruin your jewelry photography. In addition to offering context, the background is reflected in the surfaces of your jewelry.
Because they are neat and polished, white backgrounds are common in e-commerce jewelry photography; however, they can produce vivid reflections on metallic surfaces. Although black backgrounds can lessen these reflections, they may also create too much contrast or make it more difficult to see dark gemstones. To get the best of both worlds and produce more captivating reflections, think about utilizing gradient backgrounds, which gradually change from light to dark.
The angle of the camera is also very important. Because you are placing your camera directly in the path of reflected light, shooting straight down at jewelry that is lying flat frequently produces the most troublesome reflections. To get your camera out of the direct reflection path and still get a nice shot of the jewelry, try using small angles, maybe 15 to 30 degrees off vertical.
For rings, think about taking a picture of the ring at an angle that highlights its profile or using a ring holder. This improves the ring’s dimension and craftsmanship while also lessening reflections. Similar to this, soft curves and organic draping can divide large reflective surfaces into smaller, easier-to-manage pieces for bracelets and necklaces. Here is an article about background ideas for product photography.
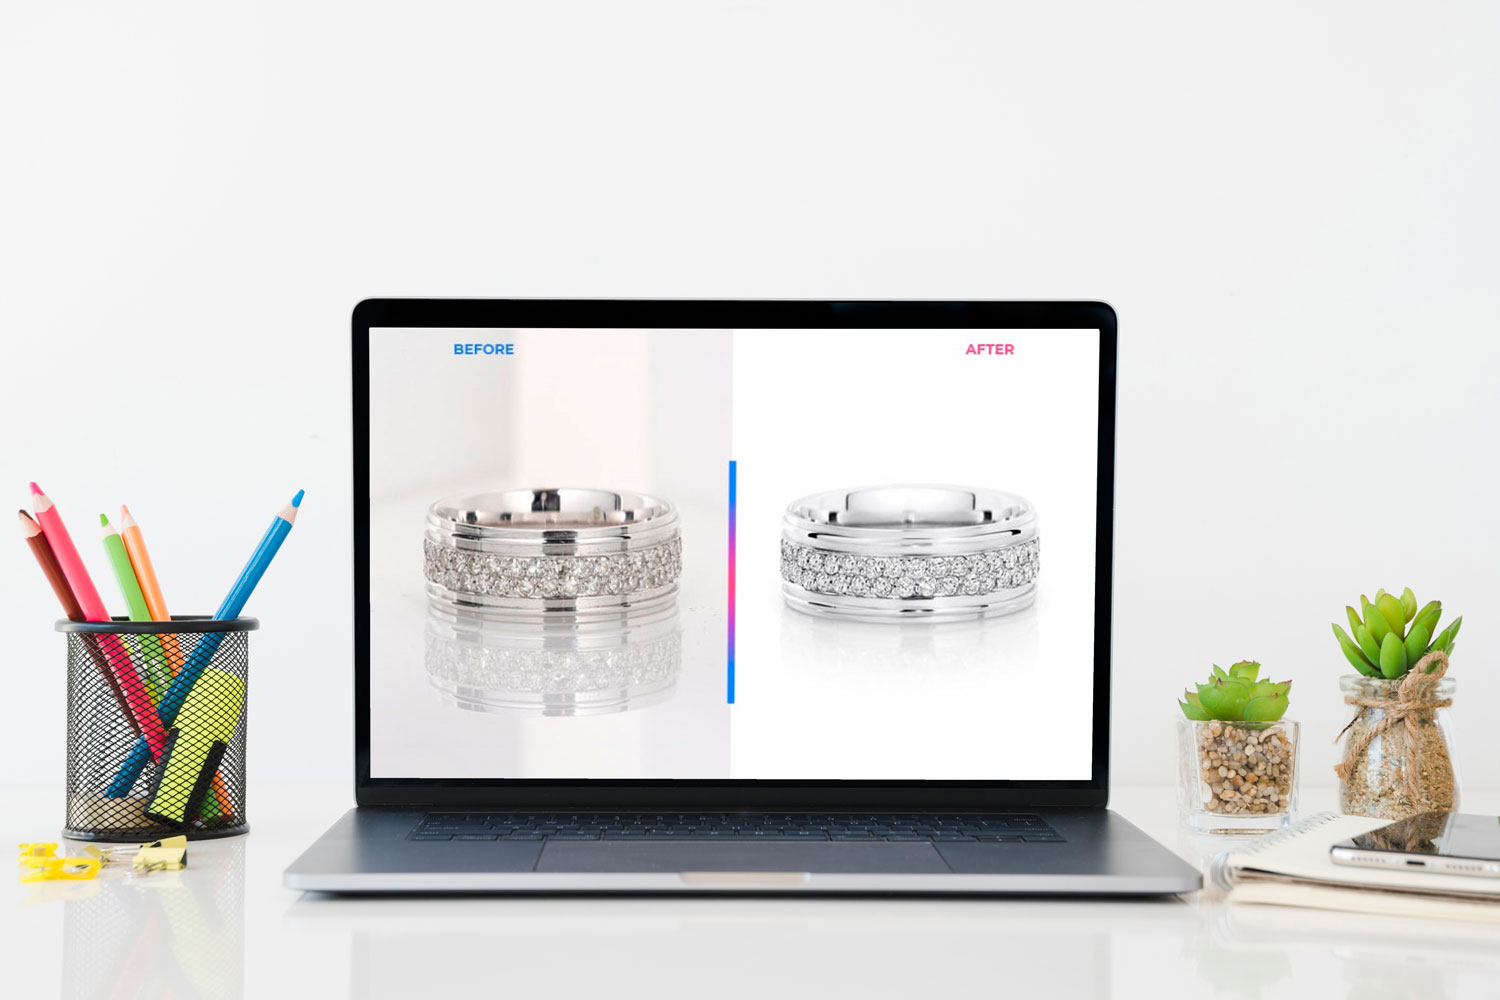
Post-Processing Techniques for Jewelry Photo Editing

Post-processing may still be necessary to correct certain reflections, even with ideal lighting and technique. You can attain that perfect final image with the help of the strong jewelry photo retouching tools available in modern photo editing software.
By copying surrounding regions over the troublesome areas, the clone stamp tool is incredibly useful for eliminating tiny undesired reflections. The healing brush can smoothly blend corrections with surrounding areas for larger reflections. To make sure your edits appear natural, use a soft brush and high magnification when using these tools.
You can control the intensity of any remaining reflections and enhance details in your jewelry photos by adjusting the curves and levels. You can improve the look of various metals and gemstones without changing the overall balance of the image by making selective color adjustments.
Consider using masking techniques for more complex jewelry photo retouching, which let you modify individual jewelry components. Precise masking allows you to reduce reflections on the band while enhancing the sparkle of a diamond.
Keep in mind that post-processing should improve your photos, not fix bad shots. Your final image will appear more natural and require less editing effort if you take a good picture in the first place.
Final words
Whether you’re promoting your design work, growing your photography portfolio, or starting an online store, knowing how to avoid reflections in jewelry photography is a useful skill. All of the methods we’ve discussed, from mastering post-processing to selecting strategic angles and employing polarizing filters and lighting control, combine to help you produce photographs that genuinely highlight the beauty of jewelry.
Instead of attempting to use every technique at once, start with one at a time. As you get more comfortable with each step, gradually add more complex techniques after you have mastered your lighting setup and experimented with polarizing filters. Keep in mind that the goal of excellent jewelry photography is to minimize distractions while emphasizing the artistry and beauty of each piece.
Making the effort to acquire these abilities will improve not only your appearance but also your company’s performance. Sales, consumer perception, and brand credibility can all be greatly impacted by jewelry photography of the highest caliber. Spend some time honing these methods, trying out various strategies, and creating your own unique style for taking gorgeous, reflection-free jewelry photos.